Monday, August 13, 2012

Necklace made from washers


Supplies:
washers
wire
fingernail polish
necklace chain
pliers

I painted the washers and applied several coats.  I waited a day to let the washers dry. 

I started at the front-center of the necklace and worked my way out.  I used pliers to pinch the wire tight and to connect the washer securely. 

I attached the chain using wire.

Simple as that!


(Backside of the washers)


Sunday, August 12, 2012

Winter Wear- Simple to make sweater


I usually have part of an idea for a craft when I start creating.  It's during the creating stages when I decide my plan for what I am making.  In this craft that is exactly what I did. 

I had some extra gray fleece fabric I found when I was cleaning out a closet.  I am so ready for cool weather and I think that is what inspired me to make a sweater in August. 

Materials I used:
Fleece fabric
safety pins
sewing machine (for 1 line of stitching)
scissors
ring (I used for a button)

First I folded the fabric down about 4 inches and sewed it in place.
(This is the only stitch I made.  You don't have to use a machine, you can sew this by hand)


Before you cut the arm holes make sure they are in the right spot.  Cut an oval shape about 6-7 inches.  
Fleece is a great fabric for this project because it doesn't fray. 


Next step is about pinning the sweater in place.  Make sure you hide the pins under the collar of the sweater. 

 Can't see the pins!

I found a ring that I could make into a button for the collar.  


Now I just have to wait until the cold weather comes


Carrot Recipe- Easy, Healthy & Tasty

I normally post about things I make around the house but I discovered a simple and tasty recipe for carrots and I had to share!


What you will need:
1 bag carrots, crinkle cut
1 teaspoon chili powder
honey
salt & pepper

EASY steps:
Steam the carrots until soft
add chili powder
add honey (about 1 tablespoon or until desired)
salt & pepper to taste

TIP: If you don't have a veggie steamer (like me) here is an easy way to cook.  Boil water in a pot with a pasta strainer on top with the a lid over the veggies.  


ENJOY!


Sunday, August 5, 2012

Adding Stripes to a Shirt


I must say that this project was not my idea.  My mother recently bought a book for me, 
P.S. I Made This...

The author is Erica Domesek, she has been featured on Craft Wars & Rachael Ray.
I think this is a great book not only for making the featured crafts but also for coming up with new craft ideas of your own. 

Page 150


I used a piece of wood to hold my shirt in place and to also keep from the paint running through to the other side.  Cardboard would also work well. 

I used painters tape


The book used paint from a squirt bottle.  I didn't have a squirt bottle so I first used spray paint... spray paint DID NOT WORK!   The paint looked faded and wasn't going on thick enough. 

I changed my plan and used a sponge roller and craft paint.  This worked really well.  I would recommend doing it this way. 


Finished product!  


Using Burlap for Party Decorations

I have a ton of burlap bean sacks that were given to us for FREE!  I have used the burlap for all kinds of crafts.  Recently, I had a "couples shower party" and I decided to use the burlap to decorate.  Researching Pintrest, I discovered all kinds of ideas for using burlap to decorate.

Here are some party ideas:


Burlap table runner
 Use burlap and ribbon to decorate jars


Make a burlap banner


Another decorated jar without ribbon


Drink Station, use burlap as a table cover and to surround the drink bucket.
(I used a towel to soak all the moisture from the drink bucket and used burlap to hide the towel)


Another banner and table cover

      (food wasn't out yet...)

Decorate the entrance. 
I used the first letters of the of the bride and groom's name. 


A tip for keeping the burlap not to fringe, use a glue gun on the backside!


Playing with Pallets

We recently laid sod in our front yard.  This took 10 pallets of grass, but with friends and family to help we finished in 7 hours!  We were left with 10 pallets which were in poor shape.  I have seen many people turn pallets into tables, chairs, benches, etc.  With all this free wood I knew I wanted to make something.  

I didn't have a plan when I first got started.  I wasn't sure if I wanted a table, coffee table, chair, or bench.  I finally decided to take the pallet wood and make a bench for our backyard.  


Here are the pallets before.  Like I said, they were in poor shape and many of the boards were cracked or weak.  The space between the boards were too far apart so I needed to pull the boards off, find the strong boards and nail them back down. 


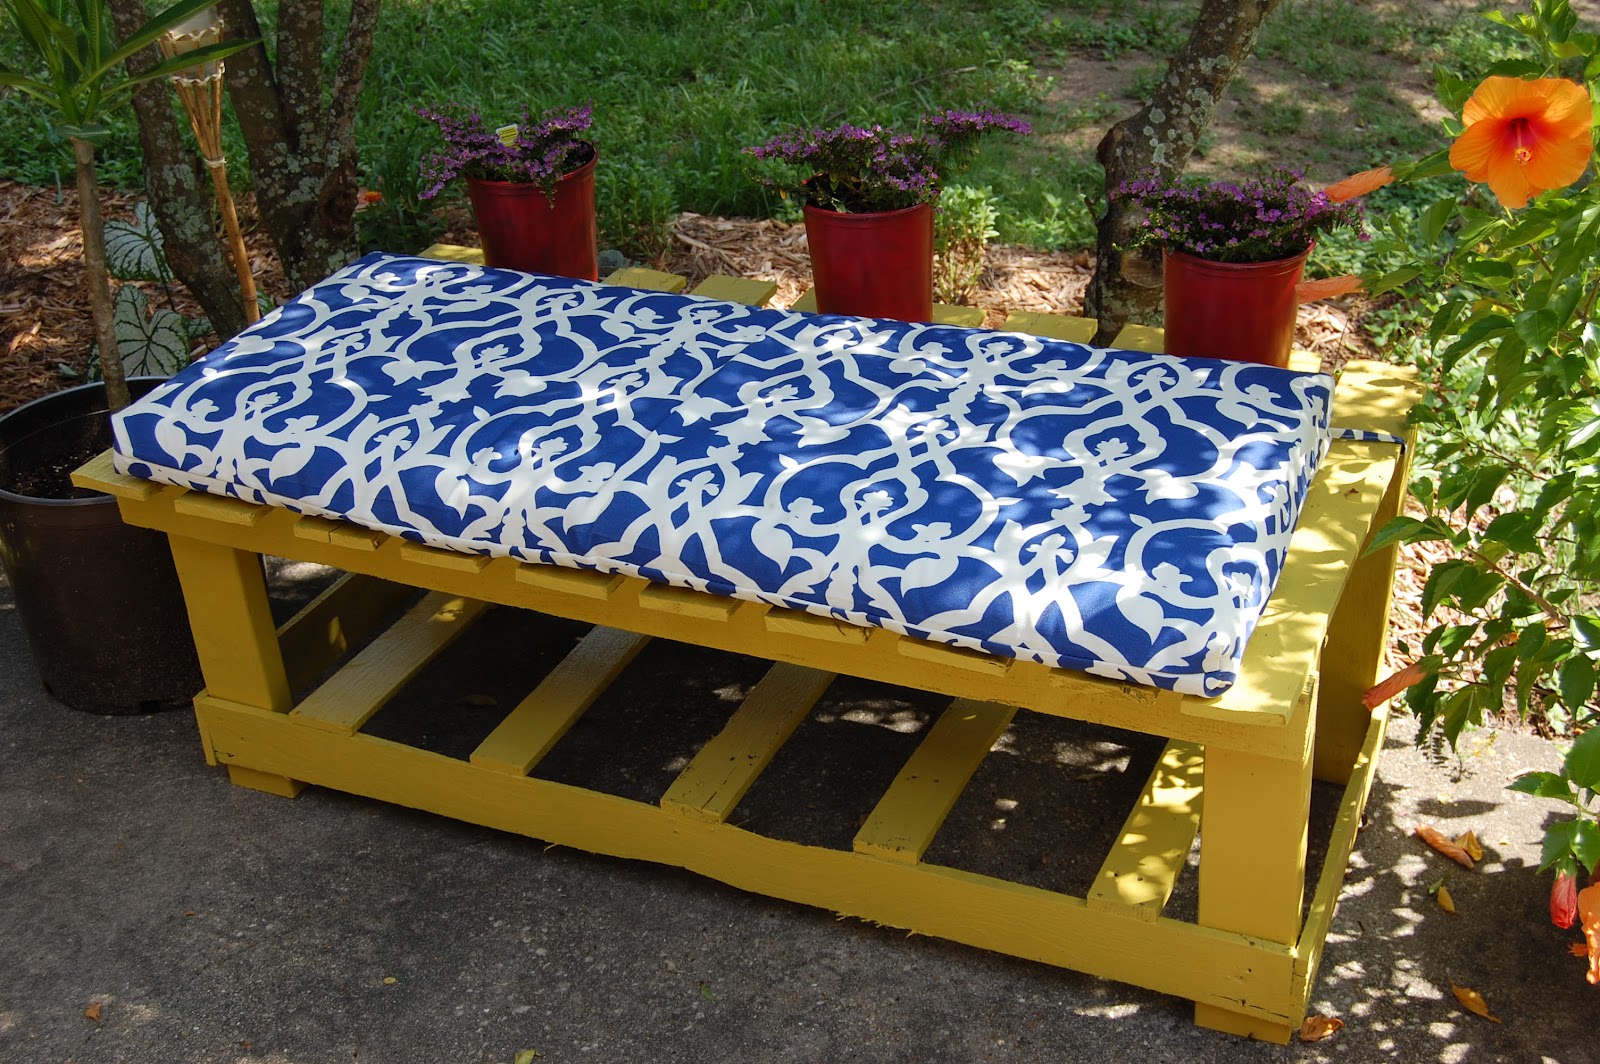
I had all the boards secure and then I realized this piece was going to be too big!  So I cut the pallet in half and then I decided on making it into a bench.


I used leftover paint from another project.  I had to apply several coats because these pallets soaked up the paint!


I was thinking about making a cushion but the foam is very expensive and I decided to look for a sale first.  Since it's the end of summer I found quite a few discounted patio cushions.  I found this one at World Market for 50% of $50.  I spent more than I wanted to but I like it!

This cushion left a little extra space on the bench so I decided to add some flower pots.  The pots are painted plastic pots (free) and I purchased the flowers for $3.50 a piece.